QEMU GameZIP Server
This is a deprecated technology used by Flashpoint 11. In newer version we have replaced this with Flashpoint Game Server.
The server allows accessing zipped game contents, also known as GameZIPs, as well as merged htdocs. This page aims to cover the details of the Flashpoint implementation.
Glossary
- GameZIP: A zipped curation content folder, according to the GameZIP specification. Read More
- merged htdocs: The root folder where web content is served from, contains matching file structure for hostnames used by games in Flashpoint.
- FUSE: Filesystem in Userspace
- union mount: A union mount is a mount which can appear to merge the contents of several directories, while keeping their physical content separate. [1]
Introduction
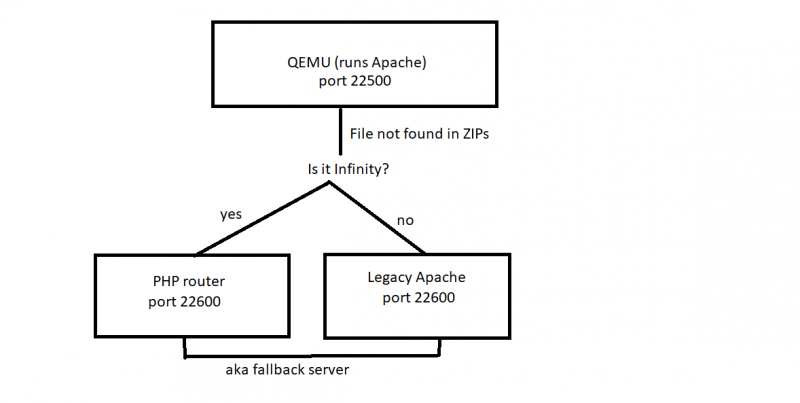
In the past, Flashpoint's server was an Apache httpd installation running on Windows. The GameZIP implementation still uses Apache but it runs on Alpine Linux instead. This allows the use of FUSE file systems to achieve a simulated view of "merged htdocs" without the extraction of GameZIPs. This instance of Alpine Linux is emulated under QEMU. QEMU was chosen because it requires no driver installation or special privileges and Alpine Linux because of its low file size and overhead. The Linux guest cannot directly access files on the host file system, instead, when a file lookup fails, the request is proxied to a fallback server to allow loading files for Legacy games. This is the Legacy Apache server in the case of Flashpoint Ultimate or the PHP router in the case of Flashpoint Infinity.
Why emulate Linux?
For our purposes, Apache is limited to a single web root and cannot serve files from ZIPs. Custom file systems require custom Windows drivers and are less mature or performant than FUSE. In addition, the use of Linux allows for the use of the entire GNU/Linux toolkit which is very flexible. It also provides a security advantage, as it sandboxes potentially untrusted PHP scripts.
How does it work?
Here is a high-level overview of how files are served:
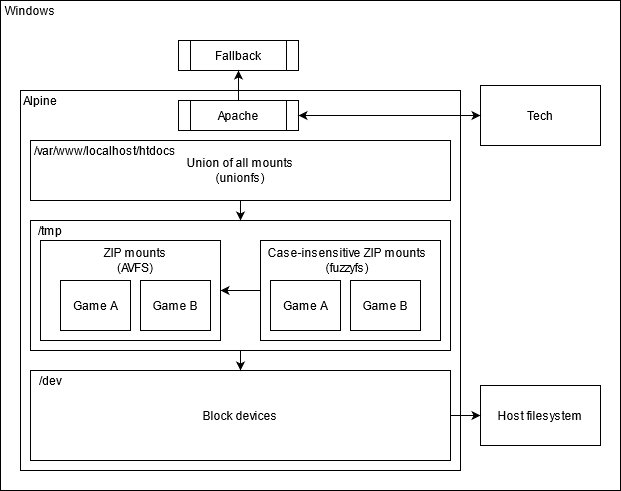
And here is a more detailed look at how the GameZip server works:
The Apache installation has a single web root, found at /var/www/localhost/htdocs.
This path is the target of a union mount, which merges the following paths:
- /root/base: Contains the PHP scripts required for mounting game ZIPs and the
.htaccessthat rewrites the HTTP Host header into a subfolder. - /tmp/
[device]: (Initially unmounted) Contains the contents of a single GameZIP.
When the emulated Alpine Linux instance starts, only /root/base is part of the union.
Mount API
The scripts found in /root/base make up the API used for controlling the union mount.
- [GET]
http://127.0.0.1:22500/mount.php?file=[device_serial_code]
This endpoint allows mounting a game ZIP from an attached block device into the virtual htdocs. It has a few possible outcomes which it will print in plain text:
“OK” (200): The file was mounted successfully.
“ALREADY_MOUNTED” (200):
The file was already previously mounted and remains available.
“NO_SUCH_FILE” (400):
The specified file was not found under the Games folder.
“NO_CONTENT_FOLDER” (400):
The specified file was not mounted because it did not contain a content folder.
“BAD_ZIP” (400):
The specified file was not mounted because it was not a valid ZIP file.
This performs the following actions:
1. Finds the attached block device with the specified serial.
If no device was found with this serial, it checks again once every 100 ms. If no matching device was found after 10 seconds, "NO_SUCH_FILE" is returned.
2. A symbolic link is created from /dev/[device] to /tmp/[device].zip
This is done in order to trick AVFS into thinking that the block device is a regular ZIP file.
AVFS can transparently access ZIP files as a folder by appending a pound sign after the filename.
An AVFS mount of the root directory exists in /root/.avfs
3. Mounts /root/.avfs/tmp/[device].zip# to /tmp/[device] as a case-insensitive mirror using fuzzyfs
fuzzyfs is a read-only filesystem that allows case-insensitive access to files.
4. Adds /tmp/[device]/content to the union mount.
This is done by unmounting /var/www/localhost/htdocs then re-mounting with a new set of settings.
Shell access
Open Data\services.json with a text editor. Remove "-display", "none" from the arguments array in Apache Webserver and save.
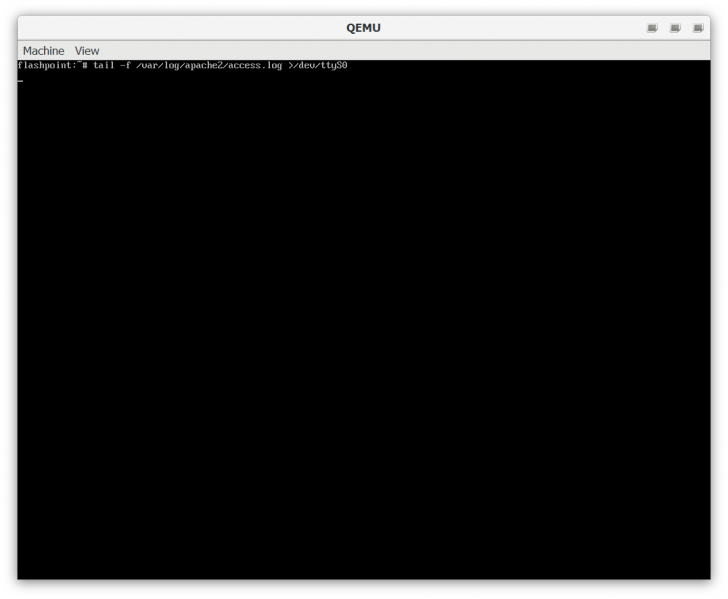
The next time you run Flashpoint, you'll get a terminal to Alpine Linux. The root user has a blank password.
Press Ctrl+C to terminate the tail command, this is used to pipe the contents of the Apache access log to the Flashpoint Launcher.
To avoid the Linux boot time when starting the launcher, a QEMU savestate is used.
- Press Ctrl+Alt+2 to access the QEMU console. Type
loadvm quickto reset the state of the machine. - Press Ctrl+Alt+1 to return to the Alpine Linux shell.
Building the Alpine Linux image
Prerequisites
Flashpoint contains a subset of the QEMU binaries to cut down of space. This means qemu-img is missing.
- Download the latest QEMU binaries [2]
- Extract them to the
Serverfolder in Flashpoint
Installing Alpine Linux
Download Fresh Alpine Linux image (Updated: 2020-09-21)
- Download the latest "Virtual" Alpine Linux release for x86 processors [3]
- Create a virtual disk image
qemu-img create -f qcow2 alpine.qcow2 2G
This will create a virtual disk image which will grow as needed up to a size of 2 GB.
- Boot the machine
qemu-system-i386 -m 512 -net nic,model=e1000 -net user -hda alpine.qcow2 -boot d -cdrom alpine-virt-3.12.0-x86.iso
This will boot the machine with maximum 512 MB of RAM and a bridged networking card.
Go through the installation process. Once done, power off the machine using poweroff.
It is recommended to back up the qcow2 image at this point.
Setting up the Flashpoint toolchain
- Boot the machine
qemu-system-i386 -m 512 -net nic,model=e1000 -net user -hda alpine.qcow2
- Run the setup script (on the guest)
cd /tmp
wget https://go.nul.sh/fpultimate -O setup
chmod +x setup
./setup
For Infinity use: https://go.nul.sh/fpinfinity
- Clean up
/tmpand power off the machine (on the guest)
rm -r /tmp/*
poweroff
- Shrink your qcow2 image (Recommended)
qemu-img convert -O qcow2 alpine.qcow2 alpine_setup.qcow2
copy /Y alpine_setup.qcow2 alpine.qcow2
Finalizing the image
Finally, we need to set up our special save state to resume execution from.
- Boot the machine
qemu-system-i386 -m 512 -net nic,model=e1000 -net user -hda alpine.qcow2
- Run the following commands (on the guest)
clear
tail -f /var/log/apache2/access.log >/dev/ttyS0
- Press Ctrl+Alt+2. Type
savevm quickand press Enter. Wait, then quit QEMU.
Your alpine.qcow2 image is ready!


